Friday, December 14, 2012

The Fourteenth Day of Christmas


The fourteenth Day of Christmas


On the fourteenth Day of Christmas,
there was tragedy.
Twenty children will not be going home to 
their parents tonight.
There are no words you can
tell these parents to make them feel
better.
There are no words that can bring their 
children home.
 
My heart, my thoughts, and my prayers
go out to the families and friends of
the victims of
Sandy Hook Elementary School
in Newtown Connecticut.


Thursday, December 13, 2012

Thirteenth Day of Christmas

The Thirteenth Day of Christmas
 
Angel Jar
 
 
Items used:
mason jar
glitter paint
glitter
angel figure


I love angels so I fixed up a spot for this one. First I painted the inside of the jar with two coats of red glitter paint. For the top of the jar I used the red glitter. Be sure to glue your lid together because they come in two pieces.
I used some silver slitter on my angel, and put a light in the jar to light it up. Its just one of those little color changing ones that come with water beads.


See you tomorrow for another craft.
Probably a gingerbread house made of clay....


Twelfth Day of christmas

The Twelfth Day of Christmas
 
Baby ornament


Items used:
clear glass ornament
stickers
ribbon


This one was simple. All I did was put some ribbon inside the ornament and some stickers on the outside of it.


Eleventh Day of Christmas

 
The Eleventh Day of Christmas Craft

Sun catcher


Items used:
a stick
glass beads
twine


This project I did earlier this year but i wanted to share it because I like it so much. Some day when I have a nice outside flower garden I want to hang it out there.
The first thing I did was find a stick outside that I liked. I then drilled hole in it all the way through. So I could thread the twine through the holes that I drilled.


I threaded the bead onto the twine and tied knots in it.
And then I threaded the strings through the holes.
After I put a string of beads in all the holes I Tied a string to the top to hang it with.
I think it would look cool in a window or something too. I have mine in my art corner for now.


Tuesday, December 11, 2012

Tenth Day of Christmas

The Tenth Day of Christmas crafts
 
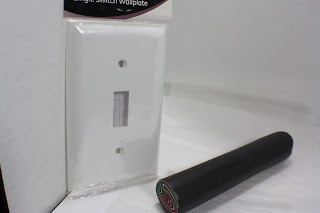
Decorating a light switch cover with polymer clay


Items used:
light switch cover
polymer clay


This one is fairly self explanatory with the pictures. If you are interested in making a clay cane I found good instructions here http://www.polymerclaycentral.com/braincane.html


After you make your cane you can cut your slices and then start adding them to the switch plate.


After adding all the slices you can flatten it out with your fingers and run your roller over it to smooth it out. Cut out your holes with a sharp knife. Then follow directions on your clay to bake. Yes you can bake the plate it will not melt.


After baking you can sand it and add some mod podge or your choice of finish and shine it up. Remember to turn off the electricity when you install. You could make matching plates for all the rooms in your house.
Well its late and I'm tired. Got to get up and do more apple, slice baking.
night all


Monday, December 10, 2012

Ninth Day of christmas

 
The Ninth Day of Christmas Craft
 
nightlight makeover


Items used:
nightlight
sun catcher paint
Sharpie


After taking the cover off to paint, I started by drawing a pattern on the nightlight with a black sharpie.
I made a simple design. You can make any design you want. I wanted mine to look like stained glass.


After I finished my design with my sharpie, I started to add my paint to different sections. Letting it dry after each color. It didn't take long because it was fast drying paint.


After it was all dry I put the cover back on the nightlight. I think adding a different colored light would be cute too.
 
Day 10 Craft will probably be something made with polymer clay, I haven't decided what yet....
Till then take care.


Sunday, December 9, 2012

Eighth Day of Christmas

 
The Eighth Day of Christmas Craft
glass ball into Christmas ornament


Items used:
glass ball
metallic paint


This is a very simple glass ornament you can make by pouring the paint into the glass ball.
Start by adding some paint into the glass ball. Swirl it around and let it coat some of the insides of the ball. When you have the amount you want wait for this layer to dry.
After Its dry you can add your next color. Swirl it around to coat the rest of the spots that are clear inside the ball. After its dry you can add ribbon around the top for a cute accent or even some stickers or other embellishments to your ornament.


Have fun.
If you have a blog you are crafting on please feel free to leave your link!!
happy crafting!


Saturday, December 8, 2012

Seventh day of Christmas

The Seventh day of Christmas Craft
 
 
Cupcake


Items used:
2 Styrofoam balls
cupcake liners
glitter
glue


I started out with the bottom color first, and then let it dry before doing the top.
I put it on the stick because it was easier to let it dry that way.


After the bottom was dry I made the icing. For that I put an extra heavy coat of glue to get the icing look.


While that was drying I made a cherry out of the smaller ball. I flattened a spot on it to put on the top of the cupcake.


After drying for a little bit, I put the cherry on top of the icing. And stuck a wire in the top so I could use it as an ornament.

 
Last, I glued the cupcake liner to the bottom and a string to the wire to hang it with.
I think it looks more like an ice cream sundae than a cupcake!
I got the idea for this off pinterest, there were a few different ways to make them.
I think with some practice they might even look like a cupcake.


Thursday, December 6, 2012

Sixth Day of Christmas

The Sixth day of Christmas Craft

Dollar store ornament makeover 


Items used:
cheap dollar store ornament
fake snow
glue


Completely cover cheap ornament in glue and coat with fake snow.


And there you have it, just about the cheapest and easiest ornament you can make.
You can go crazy with glitter to or anything else that will stick to glue and cover the ornament.
Beads, string, yarn, twine, colored sugar, the list goes on, you get the picture right?
The next few days I'm going to step it up a little and do some more difficult crafts.
See you tomorrow!


Wednesday, December 5, 2012

Fifth Day of Christmas

 
The fifth Day of Christmas Craft
 
Turning an old jar into a cute fairy world


Items used:
old jar
odds and ends from craft pile
 
 
These are just some of the things I had lying around.
It consists of some old sticks, some colored glass rocks, a pine cone, some fake mushrooms, some fake moss and some dried out flowers.

 
I arranged the moss and mushrooms with some glue.

 
I then glued some moss in the jar. And arranged the mushrooms and dried flowers.

 
I added a sticker on the outside with some frilly string.

 
I kept this one pretty simple, but you can use stickers or just about any little tiny things that would fit in your jar. You could also make clay items to add to your jar.
Haven't decided what I doing for The sixth day of Christmas.
I will figure it out when the time comes.
Have a nice day!


Tuesday, December 4, 2012

Fourth Day of Christmas

Fourth Day of Christams Crafts
 
Turning a necklace finding into an awesome necklace.
 
 
Items used:
necklace finding
mod podge
glitter
embelishments
clear casting resin


This one was pretty simple if you have the materials. I started with this necklace finding.
 
 
I made a pattern with the mod podge and added glitter.

 
I let it dry in between coats of glitter.

 
I added a starfish and some little stars.

 
I poured the resin over the star fish. Now I jsut have to wait for the rsin to set and I can make a nacklace.

Tomorrow Im going to make this jar into a fairy world...
 
 
Enjoy!


Third Day of Christmas

Third Day of Christmas
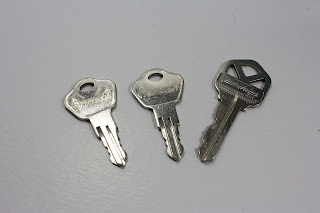
Jazz up your keys with glitter and fingernail polish.

Items used:
keys
glitter
mod podge
finger nail polish

 I used three of my keys.


I picked some glitter colors I liked.


I covered the end of the key with pod podge.

I added glitter and waited a couple hours for it to dry. Then I each side with a coat of clear fingernail polish.
You can also color code your keys, I just went with random colors.
No reason, Im just random I guess.
Enjoy!